There’s something magnetic about a well-placed piece of art. It draws the eye. It creates mood. It transforms blank walls into a story about who you are. Yet so many people struggle with one simple thing: how to hang wall art correctly. Too high. Too low. Crooked frames. Random placements. These mistakes can make even the most beautiful piece look awkward. The good news? Learning how to hang wall art isn’t complicated—it just takes the right approach, some practical tools, and a little design know-how.
Let’s break it down step by step so your art not only hangs straight but actually elevates the entire room.
Why Wall Art Placement Matters
Interior design is all about balance. Your furniture, lighting, and textures each play a role, but wall art is what ties it all together. Hang it too high and the room feels disjointed. Too small on a large wall and it disappears. Perfect placement, on the other hand, creates harmony.
Think of it like punctuation in writing. Without it, things feel messy. With it, everything makes sense. That’s why knowing how to hang wall art properly is more than a technical skill—it’s design literacy for your home.
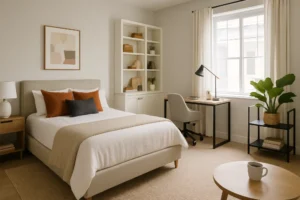
Step 1: Choose the Right Wall Art
Before grabbing a hammer, start with the art itself.
- Match the mood. A bold abstract painting might energize a living room but feel out of place in a bedroom meant for calm.
- Size it correctly. A general rule is that art should take up two-thirds to three-fourths of the width of the furniture beneath it. A tiny piece above a wide sofa will look lost.
- Think in layers. Art doesn’t have to be one piece. Consider sets, diptychs, or gallery walls to create impact.
| Room | Ideal Art Type | Size Consideration |
|---|---|---|
| Living Room | Oversized painting or print | 2/3 width of sofa or console |
| Bedroom | Calming art above bed | 2/3 width of headboard |
| Dining Area | Statement piece | Large enough to command the space |
| Hallway | Series of smaller frames | Consistent spacing across the wall |
Selecting thoughtfully ensures that once you move on to hanging, the end result will feel intentional.
Step 2: Gather the Right Tools
You can’t hang wall art with guesswork alone. A basic kit makes the job easier and more precise:
- Tape measure
- Pencil
- Level (or laser level for extra accuracy)
- Hammer or drill
- Wall anchors and screws for heavier pieces
- Painter’s tape (for visual planning)
- Hanging kit (wire, D-rings, hooks)
Pro tip: Keep a roll of painter’s tape nearby. Not only does it help you map out the placement, but it also protects delicate wall finishes when marking and drilling.
Step 3: Find the Perfect Height
Here’s where most people go wrong. They hang art too high, leaving it floating awkwardly above the room’s visual line.
The golden rule? Center the artwork at 57 inches from the floor—the average human eye level. Museums and galleries use this standard because it feels natural to the viewer.
Of course, context matters. If you’re hanging above a sofa, bed, or console table, the bottom of the frame should sit 6–8 inches above the furniture. That way, the art feels anchored to the piece instead of hovering in empty space.
For spaces with high ceilings, resist the temptation to keep climbing upward. Stick with eye-level height to maintain intimacy in the room.
Step 4: Measure and Mark
Precision is your friend here. Nothing ruins a room faster than a crooked frame.
- Measure the width of the wall or furniture beneath the art.
- Mark the center point with a pencil.
- For multiple pieces, calculate equal spacing—usually 2–6 inches between frames.
- Use painter’s tape to create outlines of where the art will go. Step back and look. Does it feel balanced? Adjust before committing to nails.
This step takes patience but pays off by saving you from patching unnecessary holes later.
Step 5: Select the Right Hardware
Different walls and different art require different hardware. Ignore this, and you risk damaged walls—or worse, shattered art on the floor.
- Light pieces (under 10 lbs): Small nails, picture hooks, or adhesive strips.
- Medium pieces (10–25 lbs): Standard wall anchors and screws.
- Heavy pieces (25+ lbs): Drywall anchors, toggle bolts, or drilling into studs.
If you rent, adhesive strips are a lifesaver. Just remember they have weight limits—don’t push them beyond what they’re rated for.
Step 6: Hang and Adjust
Now comes the satisfying part: actually putting art on the wall.
- Place your hardware at the measured marks.
- Hang the art and use a level to check straightness.
- Step back, then step to the side—sometimes what looks level up close feels off from across the room.
If your piece is heavy, consider attaching felt bumpers to the back corners. This prevents scuffs on the wall and keeps the frame from shifting.
Step 7: Arranging Multiple Pieces
Hanging one frame is simple. Creating a gallery wall or multi-piece layout? That’s where design strategy matters most.
Gallery Wall Layouts
- Grid: Uniform rows and columns, perfect for modern or minimalist spaces.
- Salon Style: Different sizes arranged asymmetrically but with balance.
- Linear: A straight line (horizontal or vertical) for a clean look.
Spacing Guidelines
- 2–3 inches between small pieces.
- 4–6 inches between larger frames.
- Keep the overall arrangement centered at eye level, not floating too high.
Here’s a trick: Lay everything on the floor first. Arrange until it feels balanced, then transfer the layout to the wall using painter’s tape outlines.
Step 8: Design Tips for Impact
Beyond the technical “how to hang wall art,” let’s talk design magic.
- Balance and proportion. Large art anchors a room, while smaller pieces can fill secondary spaces like hallways.
- Symmetry vs. asymmetry. Symmetry creates calm, while asymmetry adds energy. Choose based on the vibe you want.
- Lighting. Wall sconces or picture lights elevate art instantly. Even simple daylight can change how colors appear.
When in doubt, step back and squint. If the wall feels balanced at a glance, you’re on the right track.
Step 9: Common Mistakes to Avoid
Even seasoned decorators slip up. Here’s a quick checklist of what not to do:
- Hanging art too high (the number one offender).
- Using art that’s too small for the wall.
- Ignoring furniture scale—art should relate to what’s beneath it.
- Skipping the level and eyeballing placement.
- Forgetting to test layouts before hammering.
Avoiding these mistakes ensures your art adds polish rather than chaos.
When Rules Can Be Broken
Yes, there are guidelines. But rules exist to guide, not trap you. Sometimes hanging art off-center creates drama. Sometimes oversized art sitting directly on the floor feels chic. The secret is knowing the rules so you can break them with intention.
Final Thoughts
Learning how to hang wall art is part science, part art itself. The science is in the measuring, the leveling, the hardware. The art is in how you arrange pieces, play with scale, and choose what speaks to you.
Next time you’re staring at a blank wall, don’t freeze. Grab your tape measure, sketch out a plan, and hang with confidence. Because when your art hangs right, your space feels right—and that’s what makes a house truly yours.