Arranging garden pots may sound simple, but it’s actually an art form. The way you group, layer, and position them can turn a dull patio into a lively oasis or a small balcony into a mini botanical wonderland. Learning how to arrange garden pots goes beyond aesthetics—it impacts plant health, ease of maintenance, and how welcoming your space feels. And the best part? With just a few strategic choices, you can completely redefine your outdoor living area.
Why Arrangement Matters More Than You Think
Think of your outdoor space as a room. Furniture placement changes how people move through it, right? The same is true for pots. When they’re clustered thoughtfully, they guide the eye, create rhythm, and give balance. Scattered randomly, they look like clutter.
But it’s not only about looks:
- Plants grouped by light and watering needs thrive better.
- Strategic placement reduces maintenance time.
- Layering pots creates dimension, making small spaces appear larger.
This is where design meets practicality. You’re not just decorating—you’re curating a living space.
Step 1: Assess the Space Before You Begin
Every great arrangement starts with understanding the space. Don’t just drag pots around until something looks good. Instead:
- Check sunlight patterns. Observe your garden, patio, or balcony throughout the day. Full sun, partial shade, or deep shade? This decides which plants belong together.
- Measure the area. A few large pots might fit better than a dozen tiny ones, or vice versa.
- Identify traffic flow. Don’t block pathways or doorways. Pots should frame, not frustrate.
- Think about use. Is this space for relaxing, entertaining, or purely for plants? The arrangement should reflect the purpose.
Pro tip: Snap a photo of the space and sketch pot placements over it. It saves a lot of trial and error.
Step 2: Choose the Right Pots
Not all pots are created equal. The style, color, and material of your pots set the foundation for your arrangement.
| Material | Pros | Cons | Best For |
|---|---|---|---|
| Terracotta | Breathable, classic, affordable | Breakable, dries out quickly | Mediterranean-style gardens, succulents |
| Ceramic/Glazed | Stylish, wide color choices | Heavy, may crack in frost | Statement plants, focal points |
| Plastic/Resin | Lightweight, inexpensive | Can look cheap, less durable | Balconies, rooftop gardens |
| Metal | Sleek, modern look | Heats up quickly, may rust | Industrial-style gardens |
| Concrete/Stone | Durable, elegant | Extremely heavy | Large focal plants, formal gardens |
Color and finish also matter. Neutral pots let plants steal the show, while bold colors become art pieces themselves. Decide: do you want harmony or contrast?
Step 3: Mastering Height and Balance
One of the simplest tricks in how to arrange garden pots is playing with height. Flat arrangements feel boring, while layered ones look intentional.
Here’s where the famous “Thriller, Filler, Spiller” rule comes in:
- Thriller: Tall, dramatic plants (like palms, ornamental grasses, or even dwarf citrus). These draw the eye upward.
- Filler: Mid-sized plants with bulk or texture (lavender, coleus, ferns). They create fullness.
- Spiller: Trailing plants that cascade down (ivy, petunias, sweet potato vine). They soften edges.
Cluster these together, and suddenly, your pots tell a story instead of just sitting there.
Pro tip: Use plant stands or inverted empty pots to add hidden height variation without needing taller plants.
Step 4: Play With Color and Texture
Plants aren’t just green. They’re a palette of colors, leaf shapes, and textures waiting to be arranged.
Color strategies:
- Complementary schemes (purple flowers with yellow accents).
- Monochrome schemes (shades of green with silver and variegated leaves).
- Bold contrasts (red geraniums next to bright blue pots).
Texture strategies:
- Mix spiky plants with soft, rounded foliage.
- Pair large leaves with delicate ones.
- Use variegated plants to add instant variety.
Want impact? Place one bold plant in a striking pot as a focal point, then keep surrounding pots understated.
Step 5: Grouping and Flow
When arranging multiple pots, don’t think in singles—think in clusters. Odd numbers (3, 5, 7) almost always look better than even ones.
Here are simple grouping strategies:
- Triangle method: One tall pot, one medium, one small. Instant balance.
- Framing: Use two matching pots on either side of a door or staircase.
- Pathway guides: Line low pots along a walkway, like garden breadcrumbs.
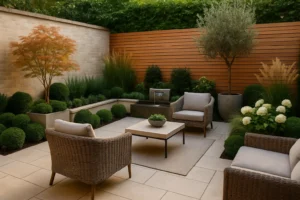
- Centerpiece clusters: Gather pots of varied heights in the middle of a patio for a sculptural effect.
Remember: leave breathing room. Crowding plants makes them compete for attention.
Step 6: Think Vertical
If you’re short on space, go up instead of out. Vertical arrangements give dimension without hogging square footage.
Ideas include:
- Wall-mounted planters.
- Hanging baskets at varying heights.
- Tiered plant stands.
- Trellises with climbing plants.
- Shelves stacked with small pots.
A vertical setup is especially powerful on balconies or small patios—it draws the eye upward and makes spaces feel larger.
Step 7: Add Personality with Accents
Arrangements aren’t just about plants. The accents you choose turn pots into part of the overall décor.
- Use one oversized decorative pot as a statement piece.
- Incorporate garden art—lanterns, sculptures, or pebbled bases.
- Try unconventional vessels: old wine barrels, vintage tins, or repurposed crates.
- Add outdoor lighting to highlight the arrangement at night.
The mix of functional plants and artistic flair gives character. It’s what makes your space yours.
Step 8: Refresh Seasonally
The best garden pot arrangements evolve. Plants bloom and fade, seasons shift, and your arrangement should adapt.
- In spring: Fill with bulbs and bright annuals.
- In summer: Go bold with tropical foliage and heat-loving flowers.
- In fall: Swap in mums, ornamental kale, and pumpkins for seasonal warmth.
- In winter: Evergreen shrubs, holly, or decorative branches keep the structure alive.
Think of your pots as rotating décor rather than permanent fixtures.
Step 9: Maintenance Is Key
Beautiful arrangements die fast if maintenance is an afterthought. Keep these tips in mind:
- Watering: Group pots with similar needs together. Drought-tolerant plants shouldn’t sit beside water-hungry ones.
- Soil: Use lightweight, well-draining potting mixes. Avoid garden soil—it compacts too quickly.
- Fertilizing: Containers lose nutrients fast. Feed regularly with slow-release or liquid fertilizers.
- Pruning: Deadhead flowers, trim overgrowth, and rotate pots so plants grow evenly.
A well-maintained arrangement always looks intentional.
Practical Examples of Arrangements
Here are quick arrangement ideas you can copy or adapt:
- Small Balcony Setup:
- Two tall pots with dwarf citrus trees.
- A tiered stand with herbs.
- Hanging baskets with trailing ivy.
- Patio Cluster:
- Central large pot with ornamental grass.
- Surrounding mid-sized pots of lavender, coleus, and begonias.
- Small spillover pots with petunias or calibrachoa.
- Front Door Welcome:
- Twin ceramic pots framing the entrance with topiary.
- Small under-plantings of pansies or seasonal blooms.
- Lanterns or pebbles at the base for added detail.
Final Thoughts
Learning how to arrange garden pots is part science, part design, and part intuition. You’re balancing plant needs, visual harmony, and personal style all at once. The good news? It’s flexible. You can always move pots around, swap plants, or experiment with new combinations.
Start simple—just three pots using the thriller, filler, spiller method. Once you get the hang of it, scale up to clusters, vertical layers, or statement displays. The joy of container gardening is in the freedom it gives you to experiment.
With thoughtful arrangement, your garden pots stop being just containers and become the building blocks of an inviting, ever-changing outdoor sanctuary.