Removing wallpaper can feel like peeling back history—layer by layer. But once the last strip is gone, you might be met with a not-so-pretty reality: torn paper, gouges, bubbles, and uneven patches staring back at you. This is exactly why knowing how to repair drywall after removing wallpaper is a skill every homeowner, renovator, or design enthusiast should master. Without the right repair process, your fresh paint or new wall treatment will only highlight every imperfection.
Here’s the thing: repairing drywall after removing wallpaper isn’t rocket science, but it does require a systematic approach, the right tools, and a keen eye for detail. Whether you’re prepping for a chic coat of paint or a modern wall texture, this guide will walk you through the exact steps, mistakes to avoid, and pro-level techniques to ensure your walls look brand new.
Why Damage Happens After Wallpaper Removal
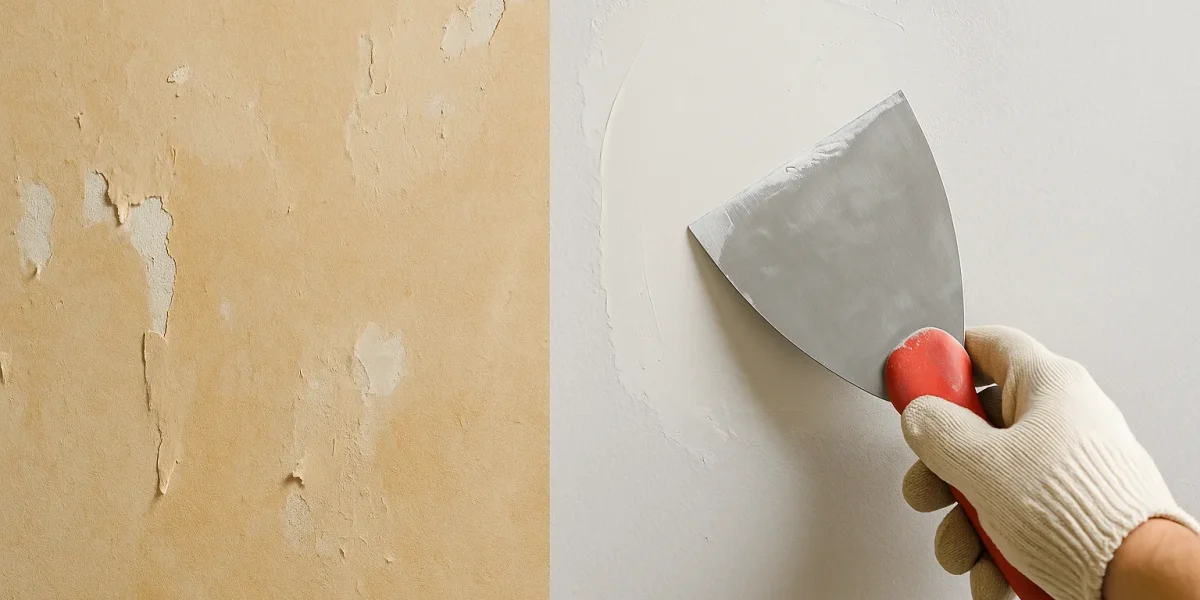
Wallpaper glue is stubborn. And the longer wallpaper stays up, the more likely it bonds to the top layer of drywall paper. When you peel it away—especially without the right tools or solution—you risk tearing the drywall’s surface, leaving behind fuzzy brown paper, holes, and uneven spots.
Common issues include:
- Gouges and dents from aggressive scraping
- Torn drywall paper exposing the brown layer beneath
- Glue residue that prevents paint or primer from adhering properly
- Raised seams or bubbles where moisture from removal has softened the surface
The goal here isn’t just to patch up the obvious damage. It’s to create a flawless, paint-ready surface that will look good for years to come.
Step 1: Assess the Damage
Before diving into repairs, take a close look at your wall. Run your hand across it with your eyes closed—you’ll feel imperfections you might miss visually.
What to Look For
| Type of Damage | Signs | Repair Approach |
|---|---|---|
| Small gouges/scratches | Light surface cuts | Fill with spackle or joint compound |
| Torn drywall paper | Brown paper exposed | Seal before patching |
| Deep dents/holes | Visible indentations | Layered joint compound + sanding |
| Hairline cracks | Fine lines | Tape + compound |
| Glue residue | Sticky or shiny patches | Warm water + sponge, possibly TSP cleaner |
Step 2: Gather Tools and Materials
The right tools will make your repair faster and cleaner. Here’s your checklist:
Tools:
- 6–10 inch drywall knife
- Putty knife (for small areas)
- Sanding block or sponge (120–220 grit)
- Utility knife
- Dust mask and safety goggles
- Drop cloth or plastic sheeting
Materials:
- Joint compound or lightweight spackle
- Drywall primer/sealer (Zinsser Gardz is a favorite)
- Drywall tape (paper or mesh for cracks)
- Painter’s tape
- Bucket and sponge
Pro Tip: For smoother application, invest in a stainless-steel drywall knife. Cheap plastic ones can leave lines you’ll regret later.
Step 3: Remove Any Residual Glue
Here’s a mistake many people make: skipping the glue removal step. Even the best paint won’t stick to glue residue, and you’ll end up with peeling or blotchy spots.
- Fill a bucket with warm water.
- Use a sponge to wet the wall, letting the water sit for 2–3 minutes on stubborn spots.
- Scrape gently with your drywall knife, holding it almost flat against the wall.
- For heavy residue, use a diluted TSP (trisodium phosphate) cleaner.
Warning: Don’t oversaturate the wall. Too much water can damage the drywall paper further.
Step 4: Light Sanding and Prep
Before you repair drywall after removing wallpaper, smooth out the rough edges.
- Lightly sand the damaged areas with 120-grit sandpaper.
- Focus on feathering out ridges left by torn paper or uneven glue removal.
- Vacuum or wipe away dust with a dry microfiber cloth.
Step 5: Treat Torn Drywall Paper
If you see brown, you’re looking at exposed drywall paper. This must be sealed before patching, or it will bubble when joint compound is applied.
How to Seal Torn Paper:
- Cut away any loose or curling edges with a utility knife.
- Apply a coat of drywall sealer or a stain-blocking primer to the exposed paper.
- Let it dry completely (usually 2–4 hours) before moving on.
This extra step prevents future peeling under paint or texture.
Step 6: Fill Gouges and Holes
Now the real repair work begins.
- For small gouges, apply a thin layer of joint compound using a 6-inch knife, pressing firmly to fill the voids.
- For deeper damage, build it up in layers—never more than 1/8 inch thick per coat—to avoid cracking.
- Smooth out the edges by feathering the compound beyond the damaged area.
Drying times vary, but most lightweight compounds are ready to sand within 4–6 hours.
Step 7: Repair Cracks and Larger Damage
Cracks and deep gouges may require reinforcement.
- Apply drywall tape over the crack or damaged area.
- Press firmly to eliminate air bubbles.
- Cover with joint compound, feathering the edges wide for a seamless blend.
- Let dry, sand, and apply a second coat if necessary.
Step 8: Sand to Perfection
A flawless finish comes down to sanding technique.
- Start with 150-grit and move to 220-grit for the final pass.
- Use a circular motion on smaller patches and long strokes for large areas.
- Hold a bright light at an angle against the wall to spot imperfections before priming.
Pro Tip: Wear a dust mask. Drywall dust is fine and gets everywhere.
Step 9: Prime the Repaired Wall
If you skip primer, you’ll regret it. The repaired sections will soak up paint differently than the rest of the wall, leading to “flashing” (uneven sheen).
- Choose a stain-blocking primer or a dedicated drywall sealer.
- Apply evenly with a roller for large areas and a brush for corners.
- Allow to dry fully before painting.
Step 10: Paint or Apply New Finish
With your wall smooth and primed, you’re ready for the fun part—painting or adding a new wall treatment.
- Use a high-quality paint for a durable finish.
- If you’re wallpapering again, start with a primer designed for wallpaper adhesion.
Step 11: Preventing Future Damage
Once you’ve gone through the effort to repair drywall after removing wallpaper, you’ll want to avoid repeating the process anytime soon.
- Always prime walls before installing new wallpaper.
- Use removable wallpaper for easier future changes.
- Keep a small tub of spackle and sanding sponge on hand for quick touch-ups.
Common Mistakes to Avoid
- Skipping glue removal – Leads to paint failure.
- Not sealing torn paper – Causes bubbling under paint.
- Applying compound too thickly – Cracks as it dries.
- Over-sanding – Can re-damage the paper layer.
- Skipping primer – Creates uneven finish and sheen.
Final Thoughts
Repairing drywall after wallpaper removal is one of those home improvement tasks that pays off big in the final look. While it can be tedious, following a methodical process ensures your paint or new wall finish goes on smooth and looks flawless.
If you remember nothing else, remember this:
- Remove all glue.
- Seal torn paper.
- Build repairs in thin, even layers.
- Prime before painting.
With these steps, you won’t just repair drywall after removing wallpaper—you’ll make it look like the damage never happened. And that’s the ultimate win for any home project.

