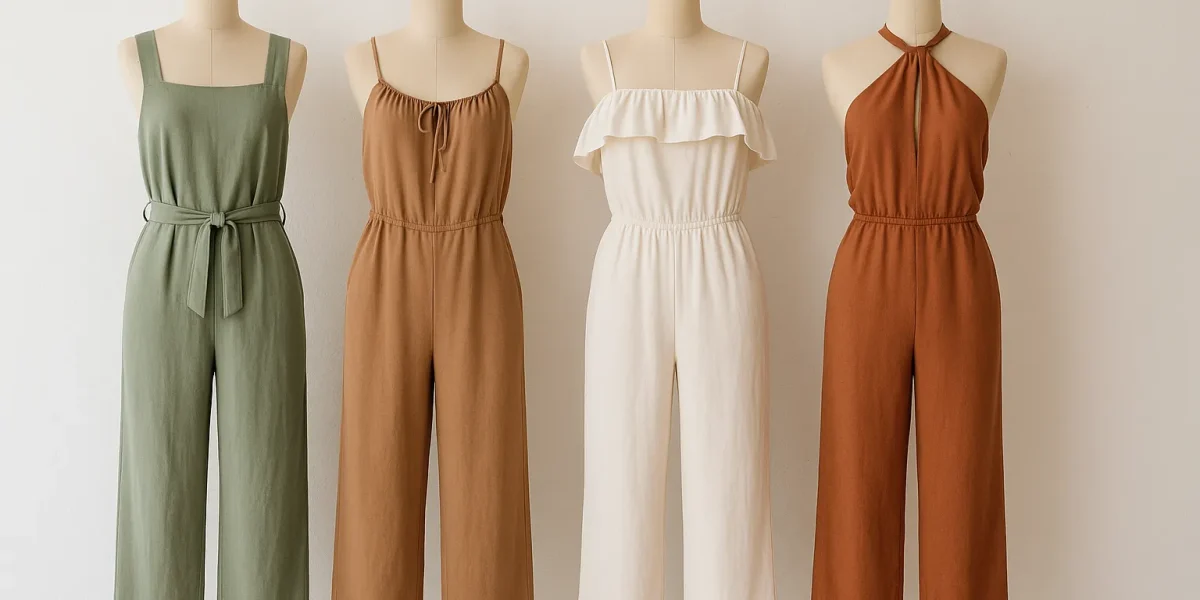
DIY jumpsuit ideas aren’t just a passing trend—they’re a full-blown movement in the world of personal style. Imagine having a jumpsuit that fits you like a glove, showcases your personality, and doesn’t cost a fortune. That’s the power of going DIY. You get to control everything: fabric, cut, fit, and details. The best part? You can create something that no one else in the room will have.
The beauty of exploring DIY jumpsuit ideas is the freedom they offer. You can keep things minimal and functional, or go all out with bold prints, layered ruffles, and unexpected textures. From casual weekend wear to office-appropriate ensembles, there’s a DIY jumpsuit for every occasion. And once you’ve made one, chances are you’ll want to make another—and another.
Let’s break down how to go from concept to finished piece, step by step, while keeping creativity and practicality in perfect balance.
The Benefits of Making Your Own Jumpsuit
You’re not just sewing an outfit. You’re building confidence, sharpening skills, and taking control over your wardrobe. Here’s why it’s worth your time:
- Perfect fit tailored to your measurements.
- Full freedom in choosing fabrics and patterns.
- More sustainable than fast fashion.
- Cost-effective—designer look without the designer price tag.
| Benefit | Why It Matters |
|---|---|
| Fit | No awkward gaping, pulling, or bunching. You’re in control. |
| Style | Unique to your personality and mood. |
| Sustainability | Reduce waste and re-use materials. |
| Cost Savings | Make multiple pieces for the price of one store-bought jumpsuit. |
Choosing the Right Fabric
The fabric you pick can make or break your DIY jumpsuit. Select the wrong material, and you’ll end up with something uncomfortable or shapeless.
Lightweight Options for Summer
- Cotton lawn: breathable and easy to sew.
- Linen: perfect for airy, casual designs.
- Rayon challis: drapes beautifully for a flowy look.
Cozy Choices for Winter
- Corduroy: durable and stylish in cooler weather.
- Wool blends: warm and structured.
- Heavier knits: great for relaxed loungewear jumpsuits.
Stretch Fabrics for Comfort
- Jersey knit: ideal for casual, pull-on styles.
- Ponte knit: holds shape without losing comfort.
Essential Tools and Supplies
Before you dive in, make sure your workspace is ready. Here’s a quick checklist:
- Fabric scissors (keep them sharp)
- Sewing machine (basic functions will do)
- Measuring tape
- Straight pins or clips
- Pattern or drafting paper
- Seam ripper (for the inevitable mistake)
- Optional: serger for polished edges
Tip: Keep all your tools organized in a box or sewing caddy so you can work efficiently without hunting for scissors mid-project.
Beginner-Friendly DIY Jumpsuit Ideas
If you’re new to sewing, start simple. You don’t have to tackle a tailored boiler suit right away.
T-Shirt to Jumpsuit Refashion
Cut and rework oversized tees into a casual jumpsuit. Add elastic at the waist and adjust the length for comfort.
Wrap Jumpsuit
Minimal seams, adjustable fit, and a flattering silhouette—perfect for first-timers.
Elastic Waist Pull-On Jumpsuit
Skip complicated zippers and go for an easy slip-on design with wide legs.
Trendy DIY Jumpsuit Ideas for Fashion-Forward Makers
Once you’ve built up your skills, level up your designs.
Wide-Leg Jumpsuit with Adjustable Straps
Perfect for summer picnics or casual Fridays. Pair with wedges for a chic vibe.
Off-the-Shoulder Ruffle Jumpsuit
Romantic and playful, ideal for garden parties or date nights.
Sleeveless Boiler Suit
Edgy, functional, and effortlessly cool. Add oversized pockets for a utility-inspired touch.
Halter Neck Backless Jumpsuit
Statement-making yet surprisingly comfortable. Great for evening wear in lightweight silk or satin.
Romper-to-Jumpsuit Transformation
Take a store-bought romper, add matching fabric extensions to create full-length legs.
Pattern-Free DIY Jumpsuit Methods
Not a fan of following patterns? You can still make something amazing.
- Use an existing jumpsuit as a template by tracing its shape.
- Drape fabric directly on a mannequin for a more organic design.
- Try no-sew techniques like fabric glue or fusible hemming tape.
Customizing Your Jumpsuit for Personality and Fit
The difference between a nice jumpsuit and a showstopper is in the details.
- Add pockets for both style and practicality.
- Experiment with decorative trims, tassels, or lace.
- Play with closures: zippers, buttons, or ties.
- Use fabric paint, block printing, or tie-dye to create one-of-a-kind patterns.
- Add a belt for shape or to break up a busy print.
Styling Your DIY Jumpsuit
Once you’ve made it, the fun really begins. A jumpsuit can be styled up or down in seconds.
- Throw on a structured blazer for a meeting.
- Add a kimono for a laid-back bohemian look.
- Pair with sneakers for errands, or heels for dinner.
Pro tip: If your jumpsuit has wide legs, balance the silhouette with fitted layers on top.
Troubleshooting Common Issues
Even experienced makers hit snags—literally. Here’s how to handle them:
- Too tight? Add side panels or adjust seam allowances.
- Uneven hem? Hang your jumpsuit overnight before trimming.
- Seams pulling? Reinforce with topstitching or a stronger stitch length.
Final Tips for Success
- Start with simpler designs, then work toward more complex projects.
- Always prewash fabric before cutting—it prevents shrinkage later.
- Keep a notebook of measurements, fabric swatches, and adjustments for future projects.
- Test stitches on scrap fabric before sewing your main pieces.
Conclusion
DIY jumpsuit ideas give you the chance to break free from store-bought limitations and explore your creativity without boundaries. Whether you’re making your very first elastic-waist version or a fully tailored evening piece, each project builds your skill set and expands your style options. And when someone asks, “Where did you get that jumpsuit?” you’ll get to say, “I made it.”


